When manually creating an invoice to be submitted using Corridor, each invoice can only pertain to a single matter. If multiple matters are needed, you must create multiple invoices.
To Create an Invoice:
Login to the Corridor Website. Administrators, managers, and invoice submitters can submit invoices.
Click on the client company on your home page.
On the Invoices: Electronic Submission page, click the Manual Submission link and select Create New.
On the Invoices: Manual Submission page, select the identifier for the client from the Client ID menu.
![]() If
a client ID is not available, an Administrator or Manager can add the
client ID to Corridor. To add a client ID, click on the View
Client IDs link on the title bar on the Invoices:
Manual Submission
page. If you are an Invoice Submitter, contact an Administrator or Manager
to add the client ID.
If
a client ID is not available, an Administrator or Manager can add the
client ID to Corridor. To add a client ID, click on the View
Client IDs link on the title bar on the Invoices:
Manual Submission
page. If you are an Invoice Submitter, contact an Administrator or Manager
to add the client ID.
Enter the following information:
Type the identifier for the invoice in the Invoice Number text box.
If multiple vendor locations exist, type the identifier for the site in the Vendor ID text box. This identifier must match exactly the identifier for your firm used by the client company in the matter management application.
Type the identifier for the client matter in the Client Matter Number text box. This identifier must match a valid matter number in the client's matter management application for the invoice to be transmitted properly. If the client company has synchronized matters with Corridor, click the ... button to select from a list of matters for which the law firm/vendor is a current player in eCounsel.
Type the date for
the invoice in the Invoice Date text box or click the  Calendar
button to select a date.
Calendar
button to select a date.
Type the start and end dates for the time period for which the invoice is being submitted in the Service Start Date and Service End Date text boxes.
Indicate the type of currency (the default value is USD for United States Dollar) used for the invoice amount. The entry in the Currency Type field must match exactly the currency type for your firm used by the client company in the matter management application.
If the invoice is subject to taxes and the client company has enabled tax support, Tax Rate field appears on the page. Type the percentage as a decimal number (for example, a tax of 8.75 percent is entered as .0875) of the fees/expenses that are taxed in the Tax Rate text box. Taxes can only be entered for a single jurisdiction.
To Create Line Items:
In the Invoice
Details area, click the  New button to enter line item
information for the invoice. At least one line item must exist in
order to submit the invoice.
New button to enter line item
information for the invoice. At least one line item must exist in
order to submit the invoice.
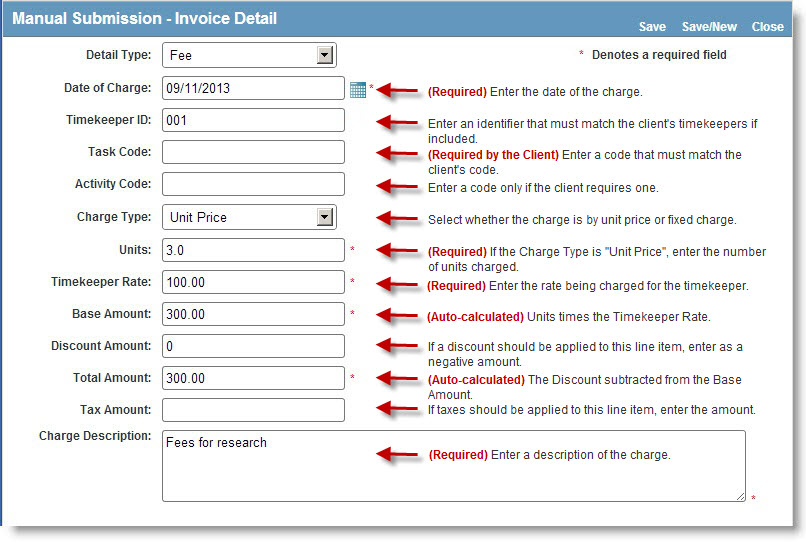
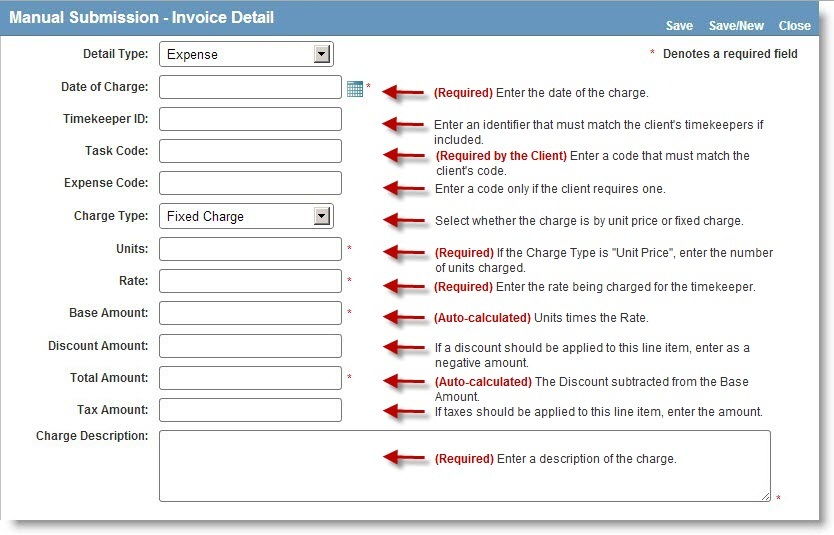
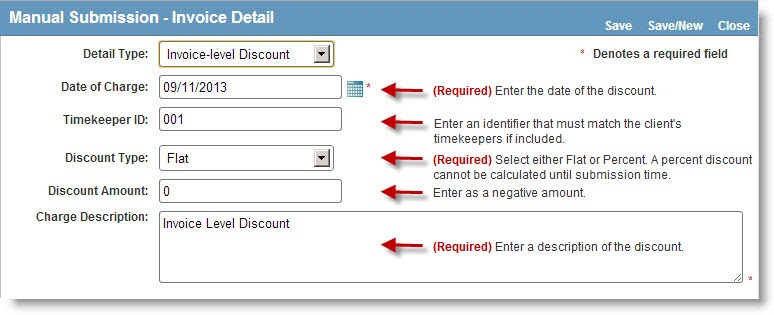
On the Manual Submission: Invoice Detail page, enter information for the line item. The fields will vary on the page depending on whether the type is a fee, expense, or invoice-level discount.
Fee Invoice Detail
Expense Invoice Detail
Invoice-level Discount Invoice Detail
If the client company has enabled tax support, a Tax Amount field appears on the page. If applicable, you must manually apply the tax rate to the base amount of the line item and enter this amount in the Tax Amount text box.
Click Save or click Save/New to enter another line item. Click Close when you have entered all line items. Click Yes to close the window.
![]() If
a required field is not entered, Corridor will prompt you to enter the
information before you can save the line item.
If
a required field is not entered, Corridor will prompt you to enter the
information before you can save the line item.
To Submit a Manually Created Invoice:
On the Invoices: Manual Submission page, click Continue.
![]() If
a required field is not entered, Corridor will prompt you to enter the
information before you can continue.
If
a required field is not entered, Corridor will prompt you to enter the
information before you can continue.
Click OK on the message box that informs you that it is recommended you save a copy of the invoice to your local disk drive. In order to correct a manually entered invoice in the event of a business rule rejection, you must save a copy of the invoice and use the steps in Correcting a Manually Entered Invoice to resubmit the invoice.
Select the location to which you want to save the file, then click Save.
![]() Corridor
uses the following naming convention for all saved invoice files: Corr<Invoice_Number>YYYYMMDDHHMM.XML, where <Invoice_Number> is the text
entered in the Invoice Number field, YYYY
is the four-digit year, MM is
the two-digit month, DD is the
day, and HHMM is the time the
file was created using a 24-hour clock (military time). Even if a file
is renamed during the save process, Corridor will refer to the file using
the internal naming convention above (on the Invoice: Status page).
Corridor
uses the following naming convention for all saved invoice files: Corr<Invoice_Number>YYYYMMDDHHMM.XML, where <Invoice_Number> is the text
entered in the Invoice Number field, YYYY
is the four-digit year, MM is
the two-digit month, DD is the
day, and HHMM is the time the
file was created using a 24-hour clock (military time). Even if a file
is renamed during the save process, Corridor will refer to the file using
the internal naming convention above (on the Invoice: Status page).
Additional validations are performed that do not prevent the invoice file from being submitted (however, submitting with these errors may cause the invoice(s) to be rejected according to the client company's billing guidelines):
The line item total must equal (rate * units) + discount amount + tax total (if the line item includes a discount and tax).
The invoice total must equal the sum of all line items.
The invoice billing start date must be before the invoice billing end date, and all line items must be within the invoice billing date range.
The following LEDES fields will be checked to contain a value: Units (fees and expenses), Rate (fees and expenses), and Timekeeper ID (fees only).
Optionally check the Ignore validation errors checkbox to submit the file with any of the additional error validations found.
If the client company has configured the matter management application to accept attachments to invoices, add attachment(s), such as receipts, to the file by invoice on the Invoices: Manual Submission page. Click Attach next to the invoice and browse to the attachment. Attachments are allowed a maximum total size of 20 MB per submission. To remove an attachment before submission, click Remove next to the attachment name.
Click the Submit LEDES File button.