The System Administration Manager in LawManager Pro and Web now contains an Entity Consolidation notebook that consolidates duplicate records in various Entities notebooks after they have been entered and links them to various information in LawManager (e.g., matters and calendar events).
This new notebook allows LawManager Administrators to consolidate duplicate entity records in the Entities notebooks to prevent confusion between entities of the same name. The notebook consolidates information from the duplicate entity records (both header and tab information) into the "valid" entity record that should be referenced and marks the duplicate entity records as inactive. Administrators also can specify if information exists in the duplicate entity records they do not want to consolidate into the "valid" entity record.
There are two ways that we create duplicate entities within LawManager:
Make the first or last names of the entities slightly different.
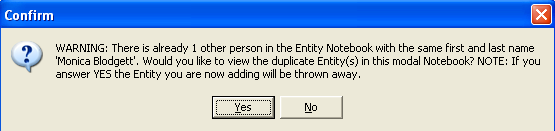
Ignore system warnings indicating duplicate entities are being created as you enter new entity records. Such warnings look like this:
If you click Yes on the warning above, a separate Entity notebook launches, displaying the duplicate entities for review, before you decide to save your newest entity record. If you click No, the newest entity record is saved.
A similar message appears when, on dropdowns containing entities, you click <new> to enter a new entity:
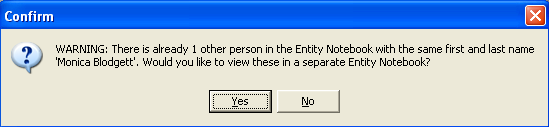
Clicking Yes to the question above displays duplicate records and allows you to choose one from the modal notebook to populate the column. Clicking No to the question allows you to save the newest duplicate record to the modal notebook and the name will appear as a dropdown choice.
The system issues similar warnings in LawManager Web.
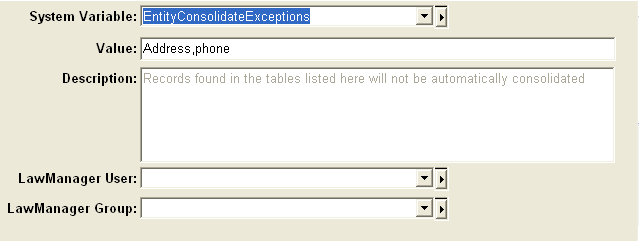
When the LawManager Administrator sets up entity consolidation, he/she first sets up the EntityConsolidationExceptions system variable that controls exceptions when performing an entity consolidation. This variable means you can specify which data from the duplicate entity records will be consolidated into the "valid" entity record and which data will remain in the duplicate records. For example, you may decide that you want all data from each duplicate entity record to be consolidated into the valid entity except for the information in the Address and Phone tabs (the Address and Phone tables in the database). You can specify this set up as follows:
|
The notebook will open in Find mode. |
|
If you are creating a new system variable, the System Variable field will be required in Edit mode. |
|
When you run an entity consolidation, the information in the Address and Phone tabs will remain in the duplicate entity records; it will not consolidate into the Address and Phone tabs of the valid entity record. |
Below is an illustration of what the System Variables notebook record should look like.
Note: If no tables are listed in the Value column of the System Variables notebook, ALL information from duplicate entity records will be consolidated into the "valid" entity record.
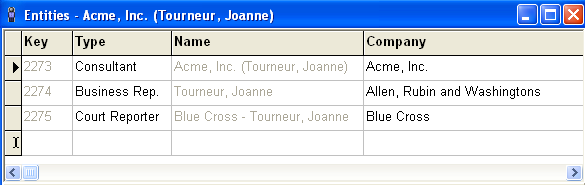
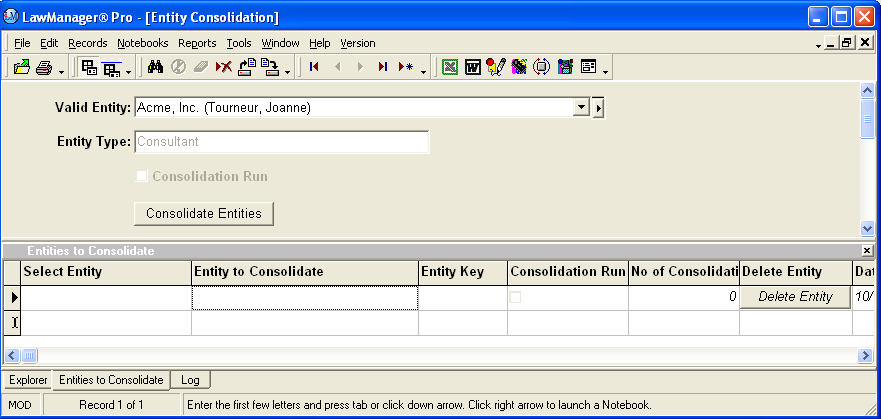
Above you see we have three entries for Joanne Tourneur in the Entities notebook. The record with key 2273 is the valid record; the other two are duplicates. Below are procedures for consolidating the contents of the two duplicate records into the third, which is valid:
|
The notebook will open in Find mode. |
|
The notebook will open in Edit mode. The Valid Entity column will be required. |
|
You will need to verify that the correct entity has been selected by verifying the entity key. You can launch into the Entities notebook from the Valid Entity column and check the entity's key field to verify. The entity type should be selected in read-only mode once you've chosen your entity and tabbed off the field. |
|
Your Entity Consolidation notebook record should look like the example below: |
|
The tab will be highlighted. |
|
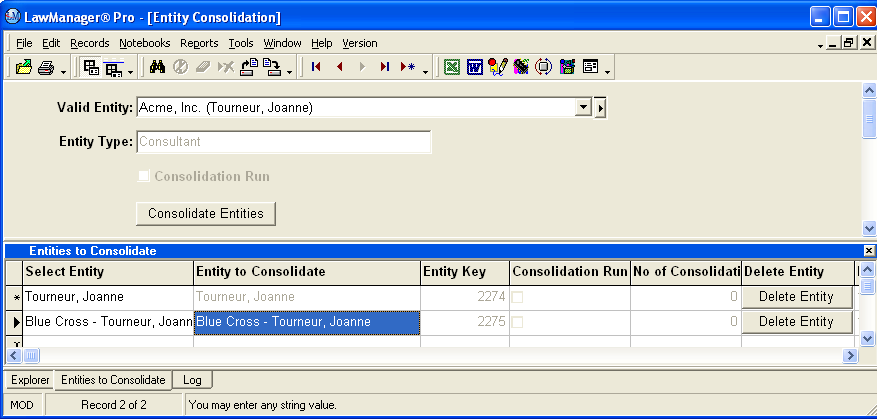
The entity name will display in the Entity to Consolidate field, and the entity key will display in the Entity Key field. |
|
All fields except Select Entity will be read-only. |
|
If the other duplicates have different entity types than the valid entity, you should receive a warning, "This entity has a different Entity Type." Note: The Consolidation Run checkbox will default to unchecked, and the No. of Consolidations field will default to 0 for all tab records. |
|
The notebook will now look like the illustration below. |
|
Your cursor will be on the main section. |
|
You will see a message, "You are about to consolidate all the Entities listed in the Entities to Consolidate Tab into Acme, Inc. (Tourneur, Joanne). This will change all references to these Entities to Acme, Inc. (Tourneur, Joanne) and mark the consolidated Entities as inactive. Do you wish to continue?" |
|
The Entities to Consolidate tab will refresh. The Consolidation Run checkbox will be checked for each record. These entities will be marked as Inactive in the Entities notebook. |
|
Records will autopopulate into the Log tab describing information from the duplicate entity records that has been consolidated into the "valid" entity record. See the illustration below: |
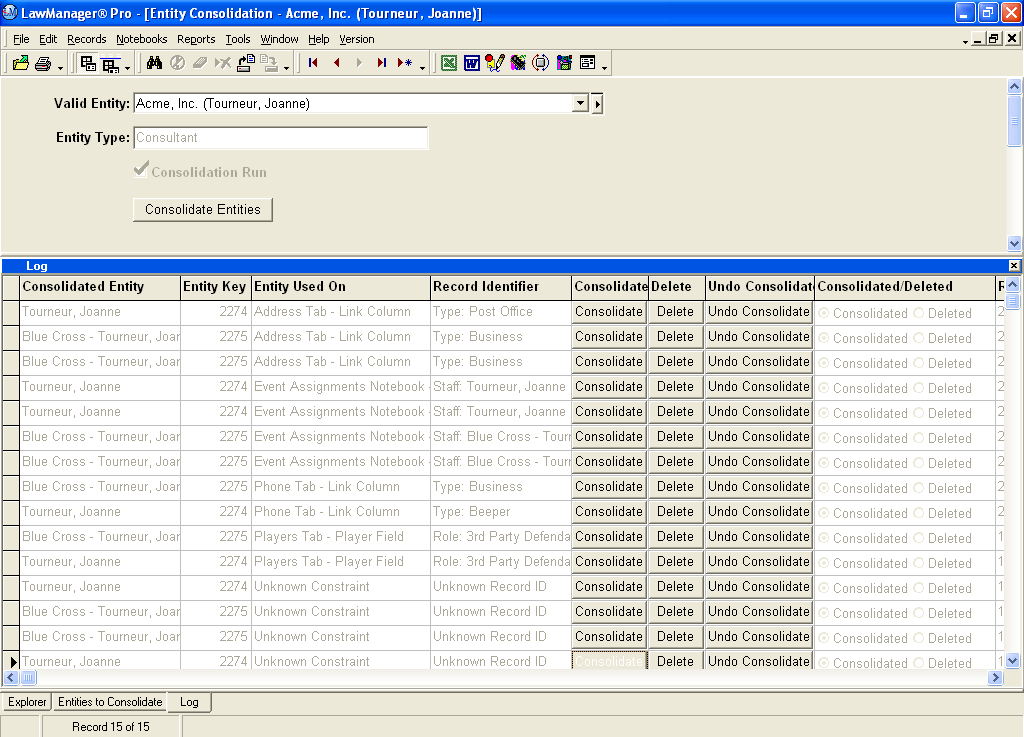
Above you see that Address tab, Phone tab, Involved Matters tab, and Calendar tab information was consolidated from entity keys 2274 and 2275 into the "valid" entity, which was key 2273. To the right of this information you see buttons to consolidate, delete, or undo consolidations for each piece of information consolidated into the "valid" entity record.
After reviewing all the information that has been consolidated into the "valid" entity, you may decide to undo the consolidation and delete individual pieces of information. This procedure is simple:
|
Be sure to select the correct entity key. |
|
The information will return to the appropriate duplicate Entities notebook record. |
|
This action will delete the piece of information from the duplicate record. |