-
Click the Entities link from your list of notebooks.
The Entities notebook will open.
-
Click
 on the toolbar or press Alt-N.
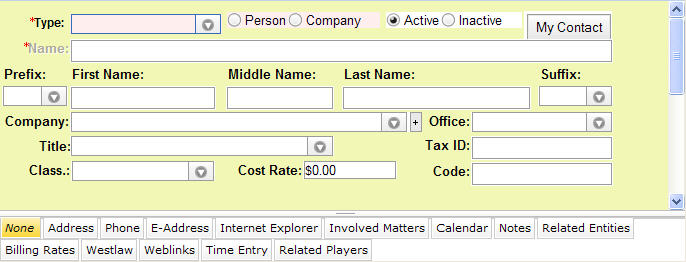
You'll see the screen below.
The Entities notebook contains a main (header) section with basic information about people associated with your cases, matters, events, and documents. The notebook also has a binder section that contains a number of tabs. You can use the tabs to view, enter, and manage additional information pertaining to the Entities notebook header. The notebook is set up for easy data entry and analysis.
The data entry instructions below pertain to the main (header) section of the Entities notebook. For an explanation of the data entry requirements for the tabs, refer to Entities Notebook Tabs Overview.
To create a new entity record:
|
The Entities notebook will open. |
|
You'll see the screen below. |

|
A default value will display in the Person/Company options. |
|
The field will populate with your choice. |
|
The default value is Active. |
Note: The Name field is disabled if the entity is a person. If the entity is a person, enter the applicable information in the Prefix, First Name, Middle Name, Last Name, and Suffix fields. |
The Name field will be populated by the name in the correct format for this entity type. |
Note: In order to add a record, Law Manager requires entry of the fields indicated above. All other fields are optional but, depending on the requirements of your organization, can be entered if the information is available. Note that some fields may not display, depending on the type of entity. To add and save the record now, go to step 13. To add optional data, continue with step 7.
|
The Company field will populate with your choice.
|
|
The Title field will populate with your choice.
|
|
The Tax ID field will populate with text. |
|
The Class. field will populate with your choice.
|
|
The hourly rate will populate with your text. Note: This field will only display of the type selected was Personnel. |
|
The Code field will populate with your choice.
|
|
Your Entities notebook record is saved in the system.
|
Note: Additional information about entities can be entered using Entities notebook tabs. See Entities Notebook Tabs Overview