Note: The Investigations notebook contains a main (header) section and a binder section that contains a number of tabs. The tabs are used to view and manage additional information pertaining to the record displayed in the header. The data entry instructions below pertain to the main (header) section of the Investigations Notebook. For an explanation of the data entry requirements for the tabs, refer to Investigation Notebook Tabs Overview.
To create an investigation record:
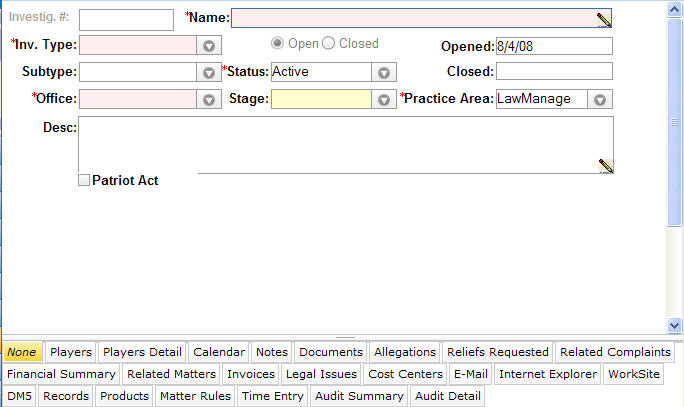
From the LawManager Web Notebook menu select Investigations.
Note: The investigation #: field will be auto-populated when you complete data entry and save the record.
In the Name field, enter a name to identify the matter being investigated.
In the Inv. Type field, select a value from the dropdown list.
In the Practice Area field, accept the default value or select an alternative from the dropdown list.
Click in the Patriot Act checkbox if the investigation is being conducted under the Patriot Act. Leave the checkbox blank if it is not.
Note: In order to add a record, LawManager requires entry of the fields indicated above. All other fields are optional but, depending on the requirements of your organization, can be entered if the information is available. To add and save the record now, go to step 14. To add optional data, continue with step 7.
In the Opened field, enter the date the investigation was opened. This field defaults to the current date. If you want to enter a different date, click in the field to open a calendar to select a new date.
In the Closed field, click the in the field to open a calendar to select the date the investigation was closed, if applicable.
In the Subtype field, select a value from the dropdown menu.
In the Status field, select a value describing the status (e.g., active, dismissed etc.) of the investigation from the dropdown menu.
In the Office field, select the office handling the investigation from the dropdown menu.
In the Stage field, select a value describing the stage (e.g., discovery, case assessment, etc) of the investigation from the dropdown list.
In the Desc field, enter a brief narrative description of the investigation.
Select ![]() or press Alt-S to save the record.
or press Alt-S to save the record.